Blog 的搭建及其特性
Table of Contents
鹤鸣于九皋,声闻于野。鱼潜在渊,或在于渚。乐彼之园,爰有树檀,其下维萚。他山之石,可以为错。 鹤鸣于九皋,声闻于天。鱼在于渚,或潜在渊。乐彼之园,爰有树檀,其下维谷。他山之石,可以攻玉。 – 鹤鸣
为什么要写博客
刘未鹏的为什么你应该(从现在开始就)写博客 应该都读过(如果没有,你应该读一下),我们都知道写博客是百利而无一害的,所以我也开始写些东西。原因如下:
- 强迫自己去深入思考
- 记录自己的想法
- 能够交到有相同兴趣的朋友
我这里使用的Org mode而不是用 Markdown 来写的文章,原因很简单:
- 喜欢 Emacs
- 因为记笔记现在都用 Org,当然写博客也要用
- Org mode 更加的强大
- 写 Latex 更加的方便
如何搭建这个博客
关于如何去使用,可以参考Publishing Org-mode files to HTML。 其中我也参考了很多人的博客:
- Dennis Ogbe
- Emacs Org-mode 生成 HTML CSS 配置
- Automated Publishing Pipeline with Org Mode
- 为什么用 org-mode 写 blog
- Blogging with Emacs
- Nicolas Petton
需要编译生成 html 文件时,运行如下的命令 M-x org-publish-all 如果要发布到 GitHub, 运行 M-x compile,会调用 public_html 下的 Makefile 文件, 这一步会将项目自动 commit, 然后 push 到 github。 下面是 Makefile, 非常简单。
pub_date     = `date +'%y.%m.%d %H:%M:%S'`
messages     = "Auto published by yydai at $(pub_data)"

publish:
     @echo "======================================"
     @echo "Begin publish the site, please wait..."
     @echo "======================================"
     @git add .
     @git commit -m $(messages)
     @git pull
     @git push origin
     @echo "===============Success================"
这里我后来有写了几个函数(代码),包括:
- blog preview 会自动 compile 当前或者所有的 blog,并且在浏览器 preview 当前的 blog。
- publish site 会自动 push 当前的改动到 github,然后自动打开 blog 首页。
- create blog 创建一个新的 blog,并插入模板。
增加了评论的功能,具体可以看 一个静态评论系统的实现。
Org mode
*粗体*粗体/斜体/斜体+删除线+删除线_下划线_下划线H_2下标: \(H_2\)E=mc^2上标: \(E=mc^2\)- 等宽字:
=git=或者~git~
\(\rm\LaTeX\)
数学公式主要使用的是 MathJax, 我们可以在 这里 和 这里 了解小使用的方法。 如果你要写 Latex,但却不知道一个符号对应的 symbol, 这个 网站能很方便的解决这个问题,只要你能画出来。 下面举几个例子:
- α, β and γ.
- When \(a \ne 0\), there are two solutions to \(ax^2 + bx + c = 0\) and they are
\[x = {-b \pm \sqrt{b^2-4ac} \over 2a}.\]
- \[\sum\limits_{i=1}^n(单项评分_i * 权重)\]
- \[ \frac{1^p+2^p+\cdot\cdot\cdot+n^p}{n^{1+p}} \]
- I am \(op_1\stackrel{abc}{\longrightarrow}op_2\)
- \[Y=\left\{ \begin{aligned} +1 & , & if & & X \geq \theta \\ -1 & , & if & & X < \theta \end{aligned} \right.\]
- a_{1}
- ♥
- \[ \begin{matrix} 1 & x & x^2 \\ 1 & y & y^2 \\ 1 & z & z^2 \\ \end{matrix}\]
- \[ \left[ \begin{array}{cc|c} 1&2&3\\ 4&5&6 \end{array} \right] \]
- \begin{align} product & ⇐ counter * product\\ counter & ⇐ counter + 1 \end{align}
代码高亮
这个博客完全是使用的 Org,其中的配置如下:
;; -n 可以显示行号
(require 'org-publish)
(setq org-publish-project-alist
      '(
        ("blog-notes"
         :base-directory "~/org/blog/"
         :base-extension "org"
         :publishing-directory "~/org"
         :recursive t
         :publishing-function org-publish-org-to-html
         :headline-levels 4
         :section-numbers nil
         :auto-preamble t
         :style    "<link rel=\"stylesheet\" type=\"text/css\" href=\"css/worg.css\"/>"
         )
        ("blog-static"
         :base-directory "~/org/blog/"
         :base-extension "css\\|js\\|png\\|jpg\\|gif\\|pdf\\|mp3\\|ogg\\|swf"
         :publishing-directory "~/org/publish/"
         :recursive t
         :publishing-function org-publish-attachment
         )
        ("blog" :components ("blog-notes" "blog-static"))
        ;;
        ))
表格
#+CAPTION: Books
#+LABEL: tbl:table1
| 书名   | 类型 |  价格 |
|--------+------+-------|
| 你好啊 | 文学 | 12.33 |
| Python | IT   |    44 |
| Java   | IT   |    55 |
| 书名 | 类型 | 价格 |
|---|---|---|
| 你好啊 | 文学 | 12.33 |
| Python | IT | 44 |
| Java | IT | 55 |
| Start Date |   End Date | Duration |
|------------+------------+----------|
| 2004.08.07 | 2005.07.08 |      335 |
#+TBLFM: $3=(date(<$2>)-date(<$1>))
来计算平均数
| Student | Maths | Physics | Mean |
|---|---|---|---|
| Bertrand | 13 | 09 | 11 |
| Henri | 15 | 14 | |
| Arnold | 17 | 13 |
这里我们在 11 这个位置,输入 :=vmean($2..$3), 回车。下面出现一个公式
#+TBLFM: @2$4=vmean($2..$3) 。这里的@2 代表第二行,$4 代表第二列。
这里我们可以按 C-c } 来确定表格的行和列位置。
例子: 这里我们可以自动生成 Email 而不用手动输入, 按 C-c C-c 就可以执行。
| First Name | Last Name | Email              |
|------------+-----------+--------------------|
| Jone       | Doe       | Jone.Doe@emacs.edu |
| Ying       | Dai       | Ying.Dai@emacs.edu |
#+TBLFM: $3='(concat $1 "." $2 "@emacs.edu")
更多的用法,我们可以看这里: The spreadsheet
将一块区域中文本转化为表格
例如下面的,选中一个区域,然后按下 C-c |,
some, comma, separated, values
就会变成
| some | comma | separated | values |
移动行和列
例如下面的表格
| 1 | 2 | 3 |
| A | B | C |
| a | b | c |
我们可以按住 M-(up dowm left right), 来进行移动。
增加新的行和列
我们可以通过 S-M-(down right),来操作。
图像

脚注
在 org mode 中,你可以为你的文章添加注脚(footnote)。注脚的格式有两种,一是方括号+数字,二是方括号+fn+名字, 例如 [fn:3] 。比如下面有两个例子:在 org mode 的正文中写下这两句话:
写好以后,使用 C-c C-x f 来生成 Footnotes.
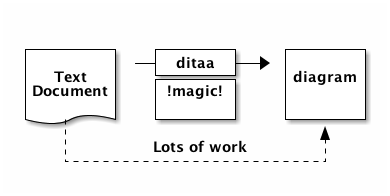
画图
ditaa
Ditaa is a small command-line utility written in Java, that can convert diagrams drawn using ascii art.
在 Emacs 中可以使用 artist-mode 来画图。
#+BEGIN_EXAMPLE ditaa :file ~/workspace/blog/org/img/ditaa.png

+--------+   +-------+    +-------+
|        | --+ ditaa +--> |       |
|  Text  |   +-------+    |diagram|
|Document|   |!magic!|    |       |
|     {d}|   |       |    |       |
+---+----+   +-------+    +-------+
    :                         ^
    |       Lots of work      |
    +-------------------------+
#+END_EXAMPLE
结果:
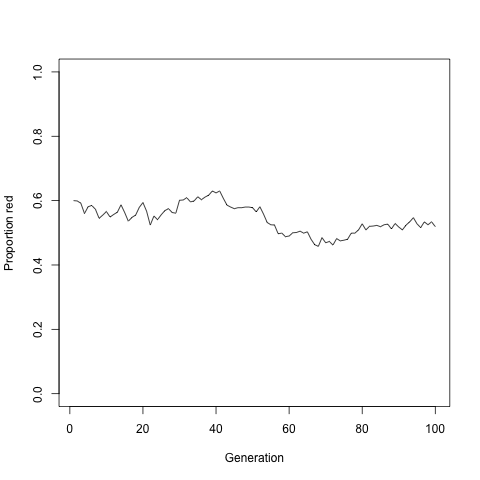
R
#+name: simpledrift(N=1000, X1=600, ngens=100)
#+begin_example R :file ~/workspace/blog/org/img/orgmode-babel-R1.png :var ngens=100 X1=600 N=1000 :results graphics
  p <- numeric(ngens)
  p[1] <- X1/N
  for(g in 2:ngens)
      p[g] <- rbinom(1, size=N, prob=p[g-1]) / N
  plot(p, type="l", ylim=c(0,1), xlab="Generation", ylab="Proportion red")
#+end_example
结果:
Shell
#+name: directories
#+begin_example sh :results replace
  cd ~ && du -sc * |grep -v total
#+end_example
结果:
| 888 | Applications |
| 212608 | Desktop |
| 200 | Documents |
| 7476688 | Downloads |
| 112 | IdeaProjects |